In the previous tutorial, we received and analyzed our problem. In this tutorial we are going to start our first OOP application. By the end of the series, we will have implemented all the functionalities, but for now, we will focus on understanding what an entity is and on what we need in order to create one.

In the context of Object-Oriented Programming, an entity typically refers to an object or a concept that represents a real-world thing. It encapsulates both data (attributes or properties) and behavior (methods or functions) related to that thing.
If we analyze our given problem, we can identify several entities, but for now we want to focus only on handling the supplier.
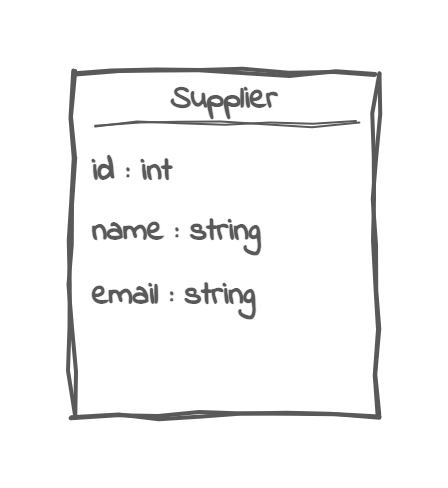
Let’s recall what we know about it: “A supplier has a name, and an email address“.
These are the attributes that describe our entity in the context of our lemonade stand.
Usually, an entity has a unique identity that distinguishes it from other objects, even if their attributes are identical. In order to represent this, we will create an integer called “id”.
We can represent the class in a diagram that would look like this:
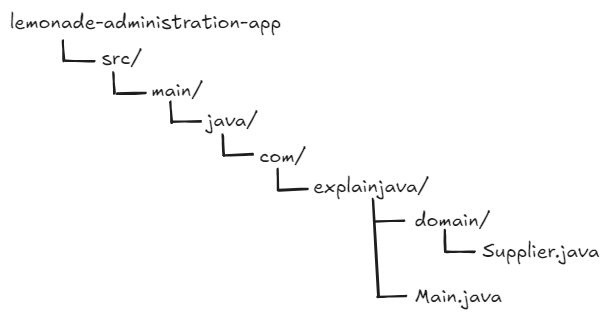
First, we need to talk about the structure of our project. Usually, when creating a new Java project, the following structure is required:
The next step is to define the Supplier class. We can refer to our diagram to add all the necessary fields. These should include:
					public class Supplier {

    private int id;

    private String name;

    private String email;

}
Constructors are special methods that are automatically called when an instance of a class is created. Their primary purpose is to initialize the newly created object, setting its initial state or performing any necessary setup tasks. We should create some for the Supplier class:
					public Supplier() {
    this.id = -1;
}

public Supplier(Integer id, String name, String email) {
    this.id = id;
    this.name = name;
    this.email = email;
}
Getters and setters are methods used to access and modify the private fields of an object. This is called Encapsulation and is the practice of keeping this data safe and secure. For instance, we can create setters and getters for the “name” field:
					 public String getName() {
    return name;
 }

public void setName(String name) {
    this.name = name;
}
By default, when you print an object in Java, it displays the object’s class name followed by its memory address, which may not be very informative. Overriding toString() allows you to provide a more meaningful and readable string representation of the object.
					@Override
    public String toString() {
        return "Supplier{" +
                "id=" + id +
                ", name='" + name + '\'' +
                ", email='" + email + '\'' +
                '}';
    }
At the end, we will have the following class:
					public class Supplier {

    private int id;
    private String name;
    private String contactEmail;

    public Supplier() {
        this.id = -1;
    }

    public Supplier(int id, String name, String contactEmail) {
        this.id = id;
        this.name = name;
        this.contactEmail = contactEmail;
    }

    public int getId() {
        return id;
    }

    public void setId(int id) {
        this.id = id;
    }

    public String getName() {
        return name;
    }

    public void setName(String name) {
        this.name = name;
    }

    public String getContactEmail() {
        return contactEmail;
    }

    public void setContactEmail(String contactEmail) {
        this.contactEmail = contactEmail;
    }

    @Override
    public String toString() {
        return "Supplier{" +
                "id=" + id +
                ", name='" + name + '\'' +
                ", contactEmail='" + contactEmail + '\'' +
                '}';
    }

}
A good practice is to analyze and generate all entities during the functionality analysis phase. You should complete the diagram and then define the classes. We’ve started with just the first entity because later on we will learn how to define the relationship between two or more entities. We don’t want to complicate things from the beginning. At the same time, an application should be easily extendable with more entities when needed.
Find out the following:
In Java, we cannot use the == operator to compare two objects because it checks if two references are identical or not. Instead, we should use the overriding of equals() method. Therefore, we can add the following method in the Supplier class:
					    @Override
    public boolean equals(Object o) {
        if (this == o) return true;
        if (o == null || getClass() != o.getClass()) return false;

        Supplier supplier = (Supplier) o;

        return Objects.equals(this.id, supplier.getId());
    }
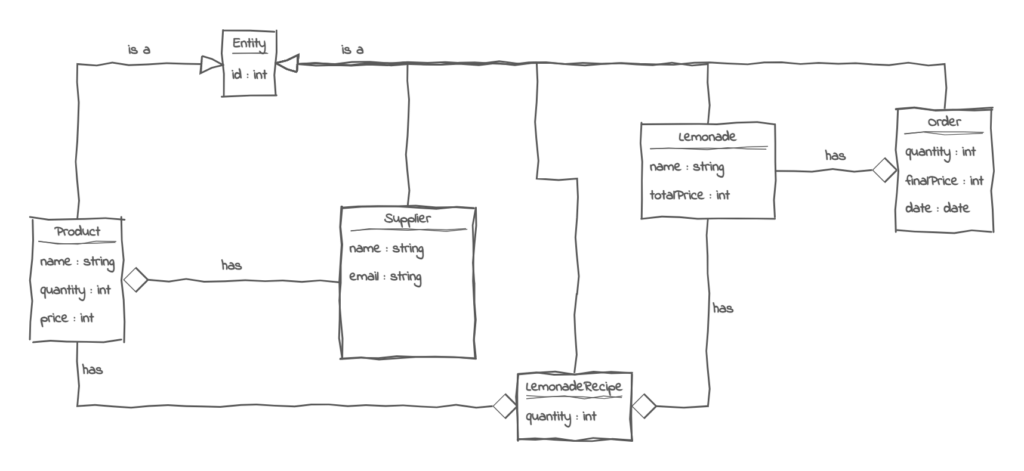
In this tutorial we identified only one entity: the supplier. In the following tutorials we will analyze the problem step by step and discuss all the entities and how to represent the relationships between them. Bellow you can see how the diagram of our problem will look like at the end of the course:
In this tutorial we analyzed our requirements in order to create the first entity. Later, we will create the remaining entities, but for now, we will focus only on handling the suppliers. We defined what a supplier is and what its attributes are, and we started coding. In the following tutorial we will continue with the next step: suppliers’ storage management.
Learn advanced concepts, work on real-world projects, and fast-track your journey to becoming a proficient Java developer. Start now and unlock your full potential in the world of Java programming!
Start now and unlock your full potential in the world of Java programming!

The place where you can start your Java journey.
© All Rights Reserved.