This is an introductory tutorial for the Spring Boot world applications. We will explain what Spring Boot is, why it is useful and popular and we will have a short tutorial to see how to generate and start a simple application.
What do we create?
Spring Boot is a tool that makes it easy to build Java applications. It’s part of the Spring Framework and it has the goal of taking away a lot of the hard setup work so you can start coding quickly. It’s like a shortcut for building apps!
There are a lot of reasons why Spring Boot is very popular in the development world, but the main ones are:
you don’t have to write a lot of setup code.
it’s beginner-friendly
it has everything you need to build web apps
you can package your app and run it anywhere Java works
At the moment, we should know that Spring Boot:
includes pre-made tools, like servers and libraries, so you don’t have to find and install them yourself.
if you want to create a web app, it will automatically configure the web server with automatic setups.
it’s perfect for creating REST APIs, websites, small independent apps(microservices), enterprise applications, prototypes or demos
How do we create it?
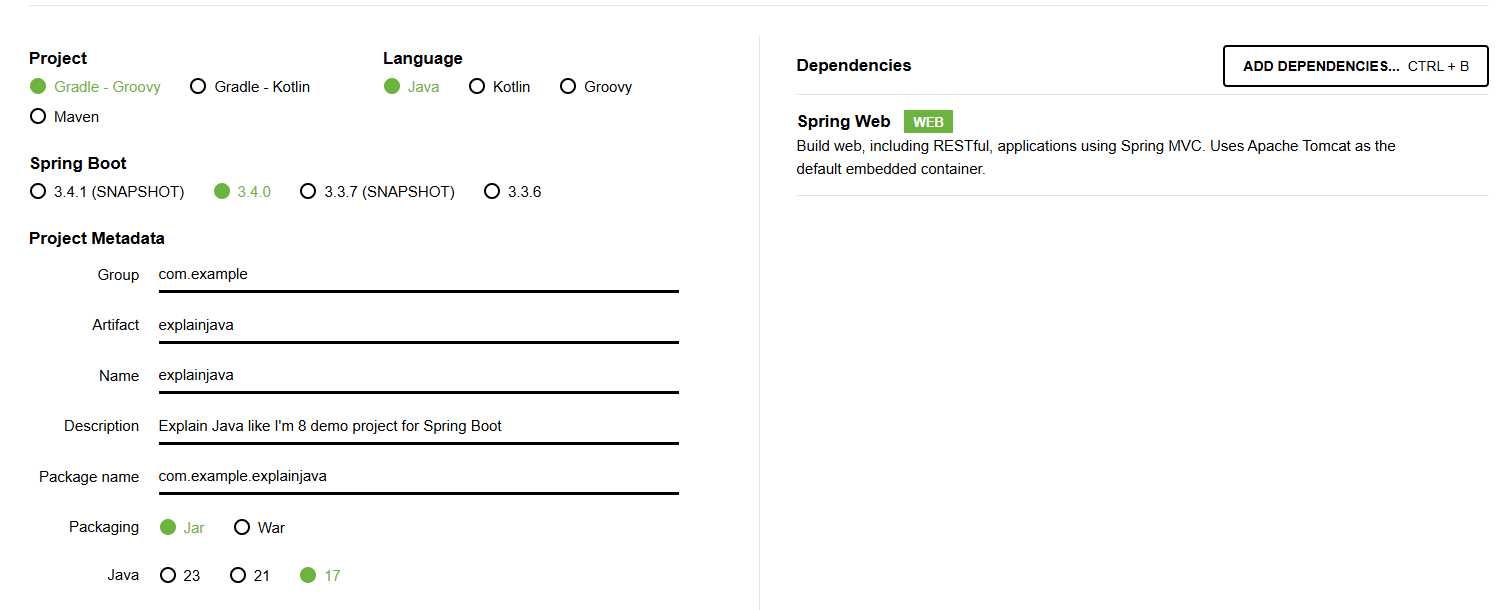
You can use Spring Initializr to quickly generate a Spring Boot project with Maven or Gradle. We can use the following configurations:
Group: com.example
Artifact: explainjava
Packing: jar
Java version: any
Dependencies: Spring Web (to create a REST API)
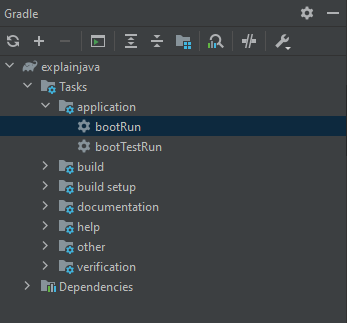
You will receive a ready-to-use project. All the configurations are already written in the build.gradle file and the start ExplainjavaApplication class is already created.
Additionally, we also have an already created structure in the resources folder and a test package.
You only need to run the gradle command bootRunto start the application. You can do this by writing it in the command line in the project root or using the Gradle tab from Intelij IDE.
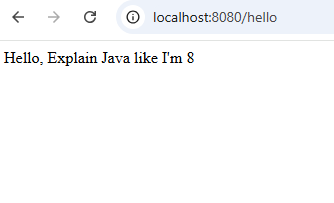
When the command is called, Spring Boot starts an embedded server (in our case Tomcat) on a default port (8080). That means that we started a web application on our computer and we can access it by writing localhost:8080 in the browser. For now, we will not receive anything, but we can write some code to solve this problem.
To test our application, we can create a new class HelloController in a new package called “controller”. The class should look like this:
					@RestController
public class HelloController {

    @GetMapping("/hello")
    public String sayHello() {
        return "Hello, this is a 'Explain Java like I'm 8' tutorial";
    }
}
Now, when you access localhost:8080/hello, you will receive the String “Hello, this is a ‘Explain Java like I’m 8’ tutorial”. You can test it by accessing the URL through your browser.
Conclusion
In this tutorial we had a short introduction to Spring Boot. In the future tutorials, we will talk about how to create a REST API using Spring Boot, how to connect it with a database, how to create secure applications and many, many more!