First step in Multi-Layer Architecture
Introduction
In the last tutorial, we created the first entity. This time, we will continue the development of our application. We will introduce the concept of multi-layer architecture and discuss some principles of each layer using code examples. For now, we want to keep things simple. We will improve our application in future tutorials.

What do we create?
A multi-layer application refers to a software architecture that is divided into separate, distinct layers, each responsible for a specific aspect of the application. This separation of concerns provides modularity, scalability, maintainability, and better code organization.
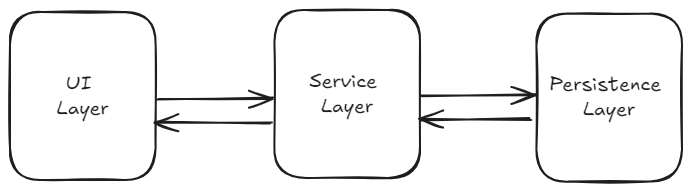
Usually, a multi-layer Java application is created of three or more layers:
- Repository layer (or persistence layer): this layer is responsible for interacting with the storage. It contains the logic for CRUD operations (Create, Read, Update, Delete) and manages the connection between the application and the storage (memory, files, database).
- Service layer: this layer contains the core logic of the application, where business rules are implemented. Usually, it processes the data received from the presentation layer, applies business rules, and interacts with the data layer.
- UI layer: this layer handles the user interface and interaction. It is responsible for displaying things to the user and collecting user input.
Why we should use multi-layer architecture:
- separation of concerns – each layer has a specific responsibility, making the application easier to understand and maintain.
- reusability – layers can be reused across different parts of the application or even in different applications.
- scalability – it is simpler to scale each part of the application independently.
- testability – each layer can be tested independently, leading to better unit testing and easier debugging.
- flexibility – changes in one layer (for instance switching databases or changing the UI) don’t require significant changes in other layers.
We will build an application which will respect multi-layer architecture with the following functionalities:
- Add a supplier.
- Remove a supplier.
- Modify a supplier.
- Show all suppliers.
For now, we will only create the supplier management part of our application and in future tutorials we will handle multiple entities. In this article we will implement a console application for the user interaction, but later we can easily expand it to a web application by changing only the Presentation Layer.
How do we create it?
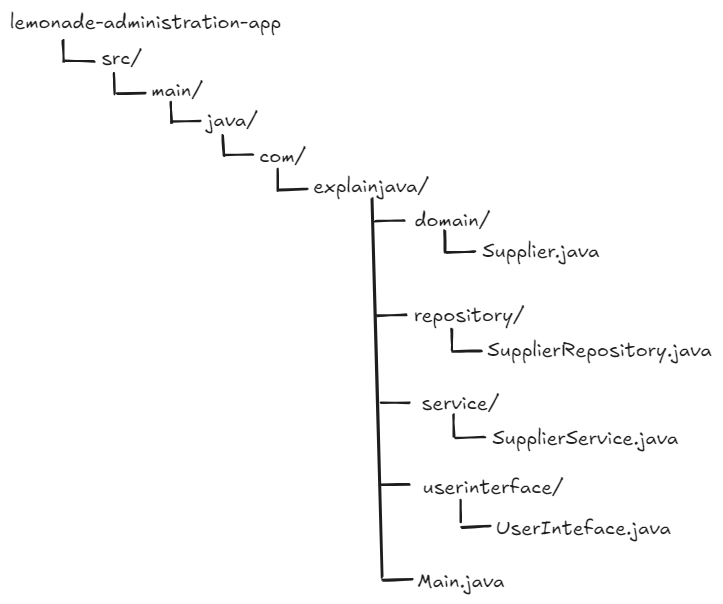
We will split our application into three layers: Repository, Service, and UI. Each layer has well-defined responsibilities. For our application, each layer represents a single class. Later on we will have multiple classes for each layer. The project should have the following structure:
Repository – The storage Layer
This layer is responsible for the entity’s storage. For now, we will store all suppliers in memory, but later, we will extend our application to store them in files or databases. For simplicity, we will use a HashMap to store the suppliers.
Usually, a repository class is responsible for implementing of CRUD operations: Create, Read, Update, Delete.
So, we need to create a new class called SupplierRepository in a new package, repository. This class will have only one attribute: a hashtable with the ID as key and a supplier as value. When the SupplierRepository is instantiated, an empty hashmap will be created.
					public class SupplierRepository {

    private Map<Integer, Supplier> suppliers;

    public SupplierRepository() {
        this.suppliers = new HashMap<>();
    }

}
As mentioned earlier, we need to create a method for each CRUD operation.
To save (“create”) our supplier in the map, we can use the following method:
					   public Supplier save(Supplier supplier) {
        this.suppliers.put(supplier.getId(), supplier);
        return supplier;
    }
To update a supplier, we can use:
					   public Supplier update(Supplier supplier) {
        if (this.suppliers.containsKey(supplier.getId())) {
            this.suppliers.put(supplier.getId(), supplier);
        }

        return supplier;
    }
To delete a supplier, we can use:
					 public void delete(int supplierId) {
        this.suppliers.remove(supplierId);
    }
For the ‘read‘ operation, we add two methods: the first one for reading a single entity, and the second one for reading all entities.
					   public Iterable<Supplier> findAll() {
        return this.suppliers.values();
    }

    public Supplier findById(int entityId) {
        return this.suppliers.get(entityId);
    }
The final SupplierRepository class will look like this:
SupplierRepository
					public class SupplierRepository {

    private Map<Integer, Supplier> suppliers;

    public SupplierRepository() {
        this.suppliers = new HashMap<>();
    }

    public Supplier save(Supplier supplier) {
        this.suppliers.put(supplier.getId(), supplier);
        return supplier;
    }

    public Supplier update(Supplier supplier) {
        if (this.suppliers.containsKey(supplier.getId())) {
            this.suppliers.put(supplier.getId(), supplier);
        }

        return supplier;
    }

    public void delete(int supplierId) {
        this.suppliers.remove(supplierId);
    }

    public Iterable<Supplier> findAll() {
        return this.suppliers.values();
    }

    public Supplier findById(int entityId) {
        return this.suppliers.get(entityId);
    }

}
Service – The business layer
This is the business layer of our application. In this layer we can perform logical operations to our list, such as filtering, sorting or applying some other modifications. We use an instance of the SupplierRepository class for supplier storage and for other business operations.
Next, we need to implement simple methods for the supplier management such as create, update or delete. Additionally, if required or requested, we can add other methods which perform other various operations to the supplier list (e.g. filtering, sorting or other complex operations).
To achieve this, we need to create a SupplierService class (in a new package called service) with SupplierRepository as class attribute. We will pass the repository to the only constructor as parameter.
					public class SupplierService {

    private SupplierRepository supplierRepository;

    public SupplierService(SupplierRepository supplierRepository) {
        this.supplierRepository = supplierRepository;
    }

}
The rest of the class is pretty straightforward: we will add a method for each required functionality: add a supplier, remove a supplier, update a supplier and view all the suppliers stored in our repository.
A method for the create operation:
					  public Supplier saveSupplier(int id, String name, String contactEmail) {
        Supplier supplier = new Supplier(id, name, contactEmail);
        Supplier savedSupplier = this.supplierRepository.save(supplier);
        return savedSupplier;
    }
A method for the remove operation:
					 public void removeSupplier(int supplierId) {
        this.supplierRepository.delete(supplierId);
    }
A method for the update operation:
					  public Supplier updateSupplier(int id, String newName, String newContactEmail) {
        Supplier supplierToUpdate = new Supplier(id, newName, newContactEmail);
        Supplier updatedSupplier = this.supplierRepository.update(supplierToUpdate);
        return updatedSupplier;
    }
And finally, two methods for the read operation:
					  public Iterable<Supplier> findAll() {
        return this.supplierRepository.findAll();
    }

    public Supplier findById(int id) {
        return this.supplierRepository.findById(id);
    }
The final SupplierService class will look like this:
SupplierService
					public class SupplierService {

    private SupplierRepository supplierRepository;

    public SupplierService(SupplierRepository supplierRepository) {
        this.supplierRepository = supplierRepository;
    }

    public Supplier saveSupplier(int id, String name, String contactEmail) {
        Supplier supplier = new Supplier(id, name, contactEmail);
        Supplier savedSupplier = supplierRepository.save(supplier);
        return savedSupplier;
    }

    public void removeSupplier(int supplierId) {
        supplierRepository.delete(supplierId);
    }

    public Supplier updateSupplier(int id, String newName, String newContactEmail) {
        Supplier supplierToUpdate = new Supplier(id, newName, newContactEmail);
        Supplier updatedSupplier = supplierRepository.update(supplierToUpdate);
        return updatedSupplier;
    }

    public Iterable<Supplier> findAll() {
        return supplierRepository.findAll();
    }

    public Supplier findById(int id) {
        return supplierRepository.findById(id);
    }
}
UI – The User’s Interface layer
The final step for our application is to handle the user interaction. We need to create a class in a new package for our console application which will handle the menu displayed to our user. This class will use the SupplierService class as class attribute.
We need to create a method for running the menu. The user interaction will be created using the Scanner class, which is used to read from the console. Therefore, we will add the Scanner as a class attribute.
					public class UserInterface {

        private SupplierService supplierService;

        private Scanner scanner = new Scanner(System.in);

        public Console(SupplierService supplierService) {
            this.supplierService = supplierService;
        }

    }
We need to create a loop which will print the menu and based on the user’s option, a method will handle the corresponding functionality. For now we will implement only the option for managing suppliers:
					    private void showMenu() {
        System.out.println("Welcome to the Lemonade Stand Administration App.");
        System.out.println("The Menu:");
        System.out.println("1. Manage suppliers");
        System.out.println("2. Manage products");
        System.out.println("3. Manage lemonades recipes");
        System.out.println("4. Create an order");
        System.out.println("5. Daily sales report");
        System.out.println("6. Empty products stock report");
        System.out.println("7. Exit");
        System.out.println("What do you want to do? ");
    }
We need to create a loop which will print the menu and based on the user’s option, a method will handle the corresponding functionality. For now we will implement only the option for managing suppliers:
					    public void runMenu() {
        Scanner scanner = new Scanner(System.in);
        int option = -1;
        while (option != 7) {
            showMenu();
            option = scanner.nextInt();

            switch (option) {
                case 1:
                    runSuppliersMenu(scanner);
                    break;
                case 2, 4, 3, 5, 6:
                    System.out.println("Not implemented yet!");
                    break;
                case 7:
                    break;

            }
        }
        scanner.close();
    }
In a similar manner we will implement the suppliers’ submenu:
					    private void showSuppliersMenu() {
        System.out.println("Welcome to the Lemonade Stand Administration App.");
        System.out.println("The Suppliers menu:");
        System.out.println("1. Add a supplier");
        System.out.println("2. Update a supplier");
        System.out.println("3. Remove a supplier");
        System.out.println("4. Display all suppliers");
        System.out.println("5. Back to main menu");
        System.out.println("What do you want to do? ");
 }

 public void runSuppliersMenu(Scanner scanner) {
        int option = -1;
        while (option != 5) {
            showSuppliersMenu();
            option = scanner.nextInt();

            switch (option) {
                case 1:
                    handleAddSupplier(scanner);
                    break;
                case 2:
                    handleRemoveSuppliers(scanner);
                    break;
                case 3:
                    handleUpdateSupplier(scanner);
                    break;
                case 4:
                    handleShowSuppliers();
                    break;
                case 5:
                    break;

            }
        }
    }
For each option we need a method for handling and calling the service method:
					    private void handleAddSupplier(Scanner scanner) {
        System.out.print("ID: ");
        int id = scanner.nextInt();

        System.out.print("Name: ");
        String name = scanner.next();

        System.out.print("Contact email: ");
        String contactEmail = scanner.next();

        Supplier savedSupplier = supplierService.saveSupplier(id, name, contactEmail);
        System.out.printf("The supplier with ID=%s has been saved \n", savedSupplier.getId());
    }
The final UserInterface class will look like this
UserInterface class
					public class UserInterface {

    private SupplierService supplierService;

    public UserInterface(SupplierService supplierService) {
        this.supplierService = supplierService;
    }

    private void showMenu() {
        System.out.println("Welcome to the Lemonade Stand Administration App.");
        System.out.println("The Menu:");
        System.out.println("1. Manage suppliers");
        System.out.println("2. Manage products");
        System.out.println("3. Manage lemonades recipes");
        System.out.println("4. Create an order");
        System.out.println("5. Daily sales report");
        System.out.println("6. Empty products stock report");
        System.out.println("7. Exit");
        System.out.println("What do you want to do? ");
    }

    private void showSuppliersMenu() {
        System.out.println("Welcome to the Lemonade Stand Administration App.");
        System.out.println("The Suppliers menu:");
        System.out.println("1. Add a supplier");
        System.out.println("2. Update a supplier");
        System.out.println("3. Remove a supplier");
        System.out.println("4. Display all suppliers");
        System.out.println("5. Back to main menu");
        System.out.println("What do you want to do? ");
    }


    public void runMenu() {
        Scanner scanner = new Scanner(System.in);
        int option = -1;
        while (option != 7) {
            showMenu();
            option = scanner.nextInt();

            switch (option) {
                case 1:
                    runSuppliersMenu(scanner);
                    break;
                case 2, 4, 3, 5, 6:
                    System.out.println("Not implemented yet!");
                    break;
                case 7:
                    break;

            }
        }
        scanner.close();
    }


    public void runSuppliersMenu(Scanner scanner) {
        int option = -1;
        while (option != 5) {
            showSuppliersMenu();
            option = scanner.nextInt();

            switch (option) {
                case 1:
                    handleAddSupplier(scanner);
                    break;
                case 2:
                    handleRemoveSuppliers(scanner);
                    break;
                case 3:
                    handleUpdateSupplier(scanner);
                    break;
                case 4:
                    handleShowSuppliers();
                    break;
                case 5:
                    break;

            }
        }
    }

    private void handleAddSupplier(Scanner scanner) {
        System.out.print("ID: ");
        int id = scanner.nextInt();

        System.out.print("Name: ");
        String name = scanner.next();

        System.out.print("Contact email: ");
        String contactEmail = scanner.next();

        Supplier savedSupplier = supplierService.saveSupplier(id, name, contactEmail);
        System.out.printf("The supplier with ID=%s has been saved \n", savedSupplier.getId());
    }

    private void handleUpdateSupplier(Scanner scanner) {
        System.out.print("The ID of the supplier to be updated: ");
        int id = scanner.nextInt();

        System.out.print("New name: ");
        String name = scanner.next();

        System.out.print("New contact email: ");
        String contactEmail = scanner.next();

        Supplier updatedSupplier = supplierService.updateSupplier(id, name, contactEmail);
        System.out.printf("The supplier with ID=%s has been updated \n", updatedSupplier.getId());
    }

    private void handleRemoveSuppliers(Scanner scanner) {
        System.out.print("The ID of the supplier to be removed: ");
        int supplierIdToRemove = scanner.nextInt();

        supplierService.removeSupplier(supplierIdToRemove);
        System.out.printf("The product with ID=%s has been removed \n", supplierIdToRemove);
    }

    private void handleShowSuppliers() {
        Iterable<Supplier> supplierList = supplierService.findAll();
        displaySuppliers(supplierList);
    }

    private void displaySuppliers(Iterable<Supplier> suppliers) {
        for (Supplier supplier : suppliers) {
            System.out.println(supplier);
        }
    }


}
The final part
In the end, we need to assemble our application by creating an instance of each in class in our main. We need to create an instance of the SupplierRepository class, then pass it to SupplierService instance and a UserInteface instance using the SupplierService instance.
					   public static void main(String[] args){
        SupplierRepository supplierRepository = new SupplierRepository();
        SupplierService supplierService = new SupplierService(supplierRepository);
        UserInterface userInterface = new UserInterface(supplierService);

        userInterface.runMenu();
    }
Time to practice
We created an application where the user is responsible for managing the ids. This approach can have both advantages and disadvantages. For instance, the user can enter an incorrect id.
Modify the application so that an id is generated automatically when the user enters a new supplier. The id should be a random integer value between 1 and 1000.
Which is the layer where the id should be generated ?
Key-points
- we can design the architecture of this type of application using a multi-layer architecture
- use use 3 layers: User Interface Layer, Service Layer and Repository Layer
- each layer has its own well-defined responsibility
- designing the application in this manner provides some benefits, such as scalability, flexibility and many others
Conclusion
We’ve created a multi-layer application for supplier management using a multi-layer architecture. To implement certain functionalities, we’ve created layers with well-defined responsibilities. In future tutorials, we will introduce additional notions to improve our application, such as validation, file storage, handling multiple entities, and more. But first, we will have a brief introduction to testing.
