Last time, we had a brief introduction to software testing. In this tutorial, we will enhance our application by adding validations. Users often make mistakes when filling out forms, so it is crucial to validate all the data they enter into our application. Handling errors effectively is important, and our application should inform users when something goes wrong. To achieve this, we will introduce the concept of throwing and catching custom created exceptions.

We will extend our application to meet the following new requirements:
From the user’s point of view, error handling will be improved. If the input data is invalid, we will display an error message and allow the user to try again. The application should not stop when incorrect data is provided.
First, in Java applications we use Exceptions to handle unexpected behavior. An exception is an event that disrupts the normal flow of a program’s execution.
In our case, when we encounter unexpected type of data, we can throw an Exception to stop the application’s usual execution flow. Then, we catch the exception and add a special behavior.
When we are using Exceptions, we have some key moments:
Secondly, let’s revisit the concept of inheritance. In short, when a class inherits another class, it can acquire and extend the properties and behaviors of the parent class.
With these two concepts in mind, we can create our own type of exception:
					public class ValidationException extends Exception {

    public ValidationException(String message){
        super(message);
    }
}
We can observe in the above code that our ValidationException class inherits the behavior of the main Exception class. This class can be added to a new package in our existing project, which we will call exceptions.
To separate the responsibility of validation, we will create a new class named SupplierValidator in a new package called validators. The purpose of this class is to validate the fields of a supplier based on the specified requirements.
We will implement basic validations for the mandatory fields and the latest requirements introduced.
					public class SupplierValidator {

    public void validateSupplier(Supplier supplier) throws ValidationException {
        StringBuilder stringBuilder = new StringBuilder();
        if (supplier.getName().length() < 3 || supplier.getName().length() > 100) {
            stringBuilder.append("The name should be between 3 and 100 chars long. \n");
        }


        String regex = "^(.+)@(.+)$";
        Pattern pattern = Pattern.compile(regex);
        Matcher matcher = pattern.matcher(supplier.getContactEmail());
        if (supplier.getContactEmail().length() < 3 || supplier.getContactEmail().length() > 100) {
            stringBuilder.append("The contact email should be between 3 and 100 chars long. \n");
        }

        if (!matcher.matches()) {
            stringBuilder.append("The contact email should have this pattern: email@email.com \n");
        }

        if (!stringBuilder.isEmpty()) {
            throw new ValidationException(stringBuilder.toString());
        }
    }
}
We need to use it in the service layer, so the code becomes as follows:
					public class SupplierService {

    private SupplierRepository supplierRepository;

    private SupplierValidator supplierValidator;

    public SupplierService(SupplierRepository supplierRepository, SupplierValidator supplierValidator) {
        this.supplierRepository = supplierRepository;
        this.supplierValidator = supplierValidator;
    }

    public Supplier saveSupplier(int id, String name, String contactEmail) throws ValidationException, IDNotUniqueException {
        Supplier supplier = new Supplier(id, name, contactEmail);
        supplierValidator.validateSupplier(supplier);
        Supplier savedSupplier = supplierRepository.save(supplier);
        return savedSupplier;
    }

    ...

}
On the other hand, to validate the ID, we need access to all the already saved suppliers to check if it is unique. The list of suppliers is stored in the Repository so the most efficient way to create this validation is to check if the ID is unique within the method used to save the entity.
We will create a special exception for this case:
					public class IDNotUniqueException extends Exception {

    public IDNotUniqueException(String message) {
        super(message);
    }
}
And the save method in the Repository will become:
					  public Supplier save(Supplier supplier) throws IDNotUniqueException {
        if(suppliers.containsKey(supplier.getId())){
            throw new IDNotUniqueException("The id is not unique ");
        }

        suppliers.put(supplier.getId(), supplier);
        return supplier;
    }
After all the validations are in place, we need to catch them in the UI layer to warn the user that the data is incorrect. We will add try catch exceptions blocks for every Exception we’ve created and handle each one with different messages.
					    private void handleAddSupplier(Scanner scanner) {
        System.out.print("ID: ");
        int id = scanner.nextInt();

        System.out.print("Name: ");
        String name = scanner.next();

        System.out.print("Contact email: ");
        String contactEmail = scanner.next();

        try {
            Supplier savedSupplier = supplierService.saveSupplier(id, name, contactEmail);
            System.out.printf("The supplier with ID=%s has been saved \n", savedSupplier.getId());
        } catch (ValidationException | IDNotUniqueException e) {
            System.out.println("Error with saving the supplier: " + e.getMessage());
        }

    }
In the end, we need to create the SupplierValidator class send it to the Service in order to use it when it is needed: for save or update product.
					    public static void main(String[] args) {
        SupplierRepository supplierRepository = new SupplierRepository();
        SupplierValidator supplierValidator = new SupplierValidator();
        SupplierService supplierService = new SupplierService(supplierRepository, supplierValidator);
        UserInterface userInterface = new UserInterface(supplierService);

        MainTest mainTest = new MainTest();
        mainTest.runAllTest();
        userInterface.runMenu();
    }
Finally, we should update our tests as well. We can pass the unhandled exceptions up to the MainTest class.
					public class MainTest {

    public void runAllTest() {
        try {
            SupplierTest domainTests = new SupplierTest();
            domainTests.testAllSupplier();

            SupplierRepositoryTest repositoryTests = new SupplierRepositoryTest();
            repositoryTests.testAllSupplierRepository();

            SupplierServiceTest serviceTests = new SupplierServiceTest();
            serviceTests.testAllSupplierService();
            System.out.println("All tests have ran successful!");
        } catch (ValidationException | IDNotUniqueException e) {
            System.out.println("The tests have failed, e=" + e.getMessage());
        }

    }
}
We can add a test case and simulate the exception:
					   public void shouldNotSaveTheElement_whenWeAddNotUniqueElement() throws IDNotUniqueException {
        SupplierRepository supplierRepository = new SupplierRepository();
        Supplier firstSupplierToSave = new Supplier(1, "Lemonades", "contact@lemonades.com");
        Supplier secondSupplierToSave = new Supplier(1, "Lemonades", "contact@lemonades.com");

        try {
            Supplier firstSavedSupplier = supplierRepository.save(firstSupplierToSave);
            Supplier secondSavedSupplier = supplierRepository.save(secondSupplierToSave);
            assert false;
        } catch (IDNotUniqueException e) {
            assert true;
        }
    }
Now we can use the application, and when we add invalid data we are warned.
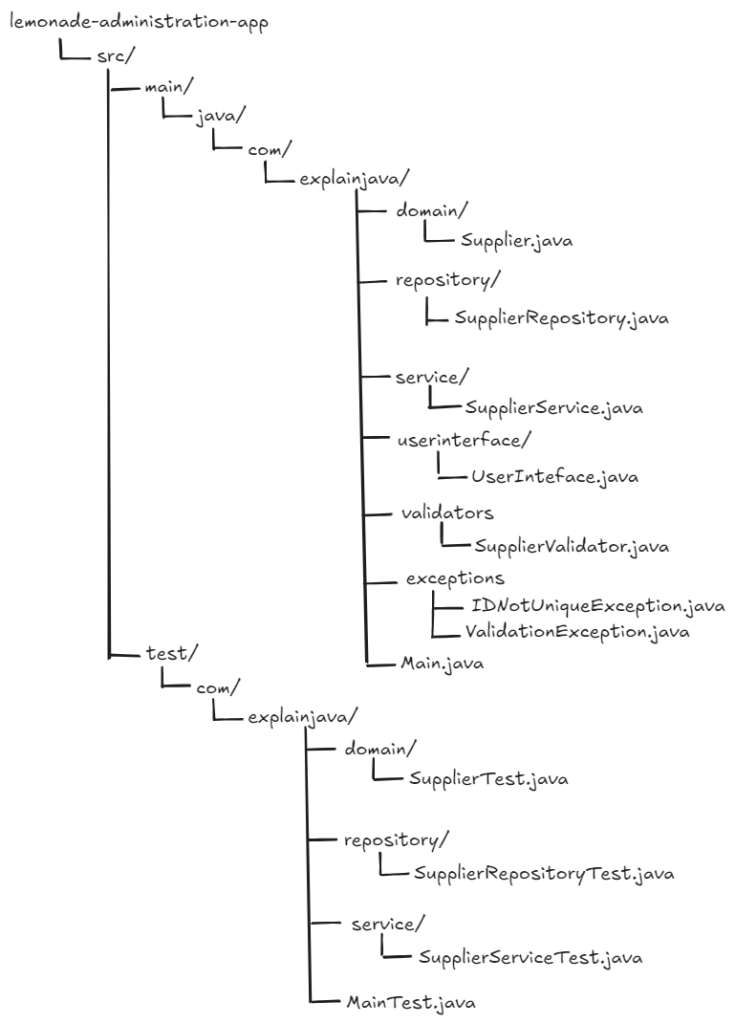
The final structure of our application should look like this:
In this tutorial we learned how to validate the user’s introduced data. We used the inheritance of the main Exception class to create our own Exception classes and threw them when the provided data was invalid. In the next tutorial, we will handle the file storage.
Learn advanced concepts, work on real-world projects, and fast-track your journey to becoming a proficient Java developer.
Start now and unlock your full potential in the world of Java programming!

The place where you can start your Java journey.
© All Rights Reserved.