In this tutorial we will find out how to integrate a public REST API using Spring Framework’s HttpExchange Interface.
When we are building software, we often need to communicate to other systems to get or send information through .
A REST API is a way for different computer systems to communicate with each other over the internet using HTTP protocol and applying the same set of predefined communication rules with the same data format (usually JSON).
The process of integrating an API used to be complex, but Spring came with some solutions.
The HttpExchange interface in Spring, introduced in Spring Framework 6 and Spring Boot 3, is a powerful feature that allows you to define declarative HTTP clients using plain Java interfaces.
It’s a modern approach to consuming REST APIs that significantly reduces boilerplate code compared to older methods like RestTemplate or even WebClient for simpler cases.
In a few words, HttpExchange lets you define an interface where each method corresponds to an HTTP request to a remote service. Spring then dynamically creates a proxy implementation of this interface at runtime. When you call a method on this proxy, Spring handles the actual HTTP request, serialization/deserialization, and error handling.
Let’s check an example for integrating the Lemonade API implemented here.
					@HttpExchange("https://api.example.com/lemonades")
public interface LemonadeApiClient {

    @GetExchange("/{id}")
    Lemonade getLemonadeById(@PathVariable String id);

    @GetExchange
    List<Lemonade> getAllLemonades();

    @PostExchange
    Lemoande saveLemonade(@RequestBody Lemonade lemonade);

    @DeleteExchange("/{id}")
    Lemonade deleteLemonade(@PathVariable String id);

    @PutExchange("/{id}")
    Lemonade updateLemonade(@PathVariable String id, @RequestBody Lemonade lemonade);

}
Now, you can simply inject UserApiClient into your services and call its methods as if it were a local service, and Spring handles the HTTP communication behind the scenes.
In the following section, we will have an example of integrating a free public API from scratch to see @HttpExchange in action.
You can use Spring Initializr to quickly generate a Spring Boot project with Maven or Gradle. We can use the following configurations:
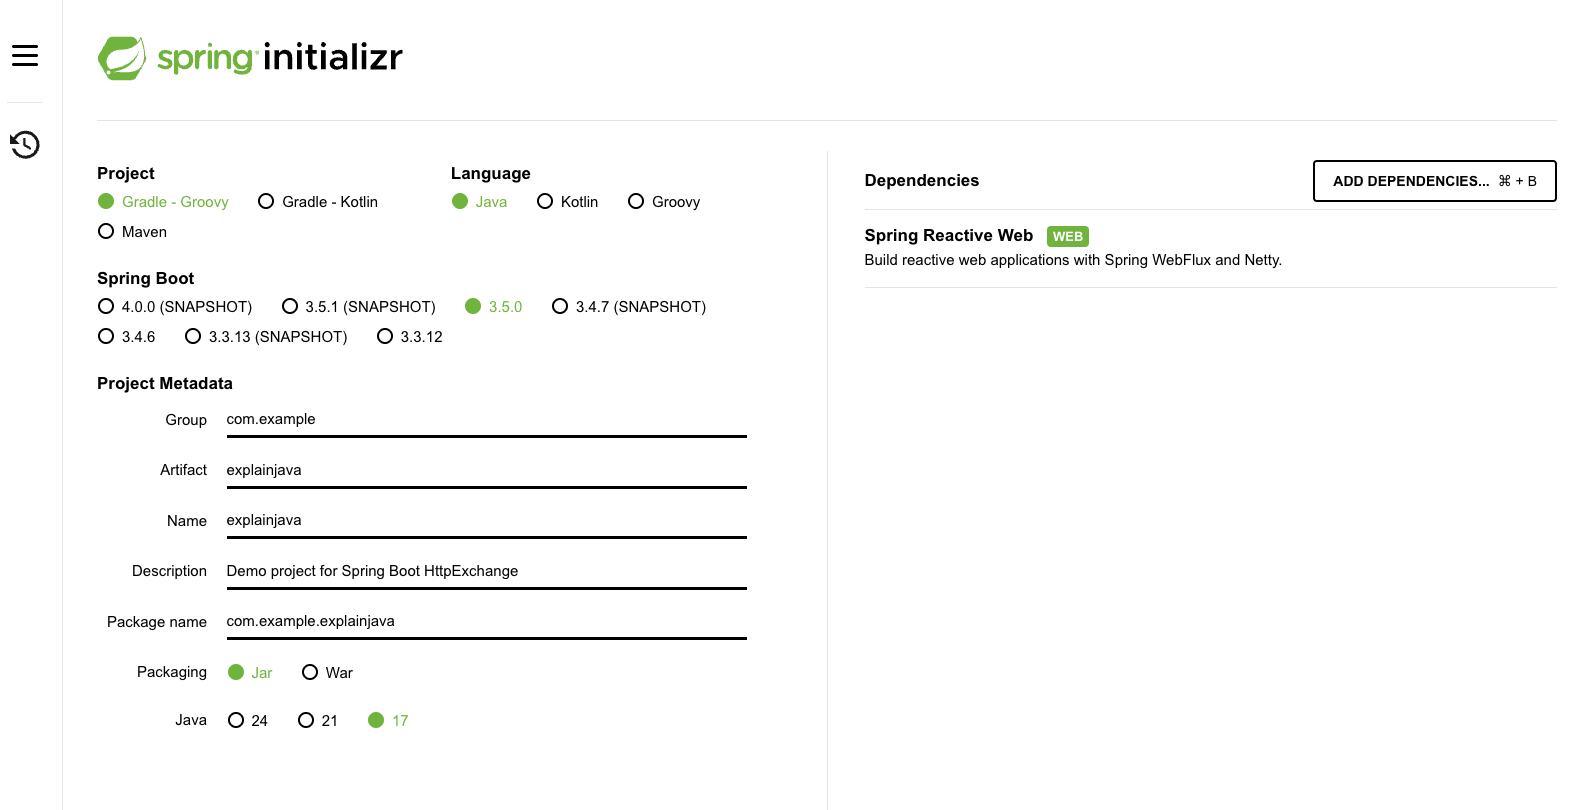
You will receive a ready-to-use project. All the configurations are already written in the build.gradle file and the start ExplainjavaApplication class is already created.
We want to create an application which integrates Cat Facts API, a Public Free API used for personal projects.

For example, if we want to integrate the GET /fact endpoint, firstly, we need to define our Fact DTO. We can use Java Records to do that in a new package called dtos.
					public record FactDTO(String fact, String length) {
}
Next, we should define our Interface. We want to integrate only one endpoint, but remember, you can add how many calls you want, as in our first example.
					@HttpExchange
public interface CatFactsClient {

    @GetExchange("/fact")
    FactDTO getFact();

}
The last step is to create a configuration class in order to tell Spring how to create CatFactsClient.
					@Configuration
public class HttpClientConfig {

    @Bean
    public CatFactsClient catFactsClient() {
        RestClient restClient = RestClient
                .builder()
                .baseUrl("https://catfact.ninja")
                .build();

        RestClientAdapter adapter = RestClientAdapter.create(restClient);
        HttpServiceProxyFactory factory = HttpServiceProxyFactory
                .builderFor(adapter)
                .build();

        return factory.createClient(CatFactsClient.class);
    }
}
That’s all. Let’s create a class to test our application:
					@Component
public class MyRunner implements CommandLineRunner {

    private final CatFactsClient catFactsClient;

    public MyRunner(CatFactsClient catFactsClient){
        this.catFactsClient = catFactsClient;
    }

    @Override
    public void run(String... args) throws Exception {
        System.out.println("Fetching the fact...");
        FactDTO factDTO = catFactsClient.getFact();
        System.out.print(factDTO);
    }
}
In this tutorial we created a simple application using @HttpExchange Interface in order to integrate a public REST API.
Learn advanced concepts, work on real-world projects, and fast-track your journey to becoming a proficient Java developer. Start now and unlock your full potential in the world of Java programming!
Start now and unlock your full potential in the world of Java programming!

The place where you can start your Java journey.
© All Rights Reserved.